Handling log files in PowerShell
Inspecting and monitoring log files.
Let’s talk about how to make something that’s already super exciting, even more fun, by using PowerShell. Why bother with fancy GUIs and polished tools when you can do it the fun way?
Yes, there’s lots of good options now when it comes to logging, like structured logs, AWS CloudWatch, Azure Monitor, ELK, etc. Tools that give you a lot of power when it comes to filtering, alerts, and monitoring. However, I still often find myself digging through good ol’ *.log files on a server.
There’s lots of “tail” style GUIs and CLI tools out there, but it’s still good to know how to do it using plain PowerShell, especially when you don’t want to deal with installing or downloading some app to a blank server.
This post ended up being MUCH longer than I had initially anticipated…first time I’ve had to add a table of contents to one of my posts.
Table of contents:
- Inspecting a log file
- Filtering output
- Modifying output
- Dealing with multiple log files
- Live monitoring with
-Wait - Working with multiple files using
ForEach-Object -Parallel - Final thoughts
Throughout this post, I use a variety of PowerShell commands. For brevity, I prefer to use the default aliases provided by PowerShell. For one off scripts, that’s usually fine, but for a production script, you should try to use the full name of a command and not its alias.
If you’re unsure about what a particular alias is, such as gc, %, ?, oh, etc. You can use Get-Alias to look up what it means.
Inspecting a log file
Let’s get the basics out of the way…Using the Get-Content command (aliases: cat, gc). If you’re not familiar with this command, it’s pretty simple. It takes a file path and returns the contents of that file as messages to the console window. By default, it returns each line as a separate string. So if you have a text file with 100 lines, it will return 100 strings.
On its own, it’s probably not very useful for checking on a log file, but combine it with other commands like more, Where-Object and custom parsing functions and you can do some pretty cool stuff.
The simplest of examples would be:
gc '.\2022-04-03.log'
This will return the entire file to the console…not too useful if it’s 50,000 lines of log data. If all you want to do is manually step through the file, you can pipe the results to the Out-Host (aliases: oh) command using the -Paging option.
gc '.\2022-04-03.log' | oh -Paging
This gives you the ability to page (space) or step (enter) through each line of the log file. This is meant to be the PowerShell equivalent to using more.exe. Personally, I still prefer to use more.exe as it seems to run better, and it doesn’t output the instructions every time.
gc '.\2022-04-03.log' | more
The usage here is the same, space to page results, and enter to step to the next line.
You can test them out using these commands:
1..300 | oh -Paging
1..300 | more
Filtering output
Stepping through the logs is great…but if you have 10,000 lines to go through, that may be a waste of time. There’s a few options you have for limiting the output.
Using -Tail and -TotalCount to limit total output
Output the last 10 lines:
gc '.\2022-04-03.log' -Tail 10
Output the first 10 lines:
gc '.\2022-04-03.log' -TotalCount 10
Using Where-Object to filter results
If you’re dealing with a noisy log file, it may be useful to filter out certain log messages, or only include certain messages. For example, maybe you have multiple applications logging to the same file, and each log message includes the name of the app it comes from.
Using Where-Object (aliases: where, ?) you can use globs (-Like, -NotLike) or regex (-Match, -NotMatch) to include or exclude lines based on criteria you specify.
For example, lets say we have a log file that looks like this:
2022-04-03T15:14:55 [MyApp] [INFO] :: Downloading file
2022-04-03T15:14:57 [AnotherApp] [INFO] :: Cleaning up temporary files
2022-04-03T15:14:59 [OtherApp] [INFO] :: Loading data into database table
It will get annoying trying to sift through this log file if you don’t care about “AnotherApp” or “OtherApp”. Let’s filter those out using both inclusive and exclusive logic.
Inclusive: This will only return messages that match the regex pattern \[MyApp\]
gc '.\2022-04-03.log' | ? { $_ -Match '\[MyApp\]' }
Exclusive: This will exclude the other two apps we’re not interested in:
gc '.\2022-04-03.log' | ? { $_ -NotMatch '\[(AnotherApp|OtherApp)\]' }
If you’re not familiar with regex, this is saying to exclude any messages that matches either [AnotherApp] or [OtherApp].
If you want to avoid regex, you can use the -Like and -NotLike filters. It would work the same way as the two regex examples above, but instead you would use globs:
Inclusive:
gc '.\2022-04-03.log' | ? { $_ -Like '*[MyApp]*' }
Exclusive:
gc '.\2022-04-03.log' |
    ? { ($_ -NotLike '*[AnotherApp]*') -and ($_ -NotLike '*[OtherApp]*') }
As far as I know, globs don’t allow you to specify multiple criteria in a single pattern, so you need to use two separate filters
These filters also come in handy when you want to search for a specific keyword, such as “Exception” or “Error”, or maybe a specific error message that’s getting returned to a UI.
Using Select-String to filter results
Another option you have for filtering output is the Select-String (aliases: sls) command.
You can use it directly by supplying a file path, or piping to it.
The simple usage of Select-String is very similar to using -Match with Where-Object, but you don’t have as much of the overhead:
sls -Pattern '\[MyApp\]' -Path '.\2022-04-03.log'
or
gci '.\2022-04-03.log' | sls '\[MyApp\]'
By default, Select-String will highlight the search term and output the entire line prepended with the filename. It also stores some search metadata behind the scenes. This may not be necessary if all you care about is the output.
Use -NoEmphasis to disable highlighting and -Raw to disable highlighting and disable capturing all extra metadata. This way it acts more like an output filter and runs much quicker.
Modifying output
Another great option besides filtering is being able to modify the output by passing each line through a script.
Add color by assignment
In the course of writing this post, I discovered a fun new trick…coloring the messages based on their content.
If you’re looking at a plain log file, then the output is going to be black and white. What if you could identify certain keywords, and assign a color for that message?
Here’s an example:
gc '.\2022-04-03.log' |
    % {
        if ($_ -match 'ERROR') {
            Write-Host $_ -ForegroundColor Red
        } else {
            Write-Host $_
        }
    }
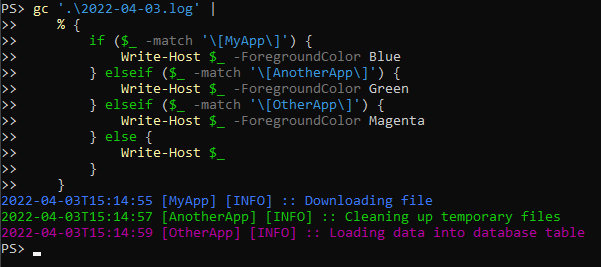
Any time the string “ERROR” occurs, it will write the entire line in Red. You could expand on this using even more complex logic. Maybe you want to assign a color based on which app is logging…so [MyApp] gets Blue, [AnotherApp] gets Green and [OtherApp] gets Magenta.
gc '.\2022-04-03.log' |
    % {
        if ($_ -match '\[MyApp\]') {
            Write-Host $_ -ForegroundColor Blue
        } elseif ($_ -match '\[AnotherApp\]') {
            Write-Host $_ -ForegroundColor Green
        } elseif ($_ -match '\[OtherApp\]') {
            Write-Host $_ -ForegroundColor Magenta
        } else {
            Write-Host $_
        }
    }
Ending up with this:
Dealing with multiple log files
This is more of a quick note, but everything that has been shown so far can be run against multiple files at the same time. This can be done using either the Get-Content command, or by using any other means of getting a list of files, such as using Get-ChildItem (aliases: gci, ls, dir).
Example:
gc -Path *.log
gci -Filter *.log | gc
Both of these commands will scan the current directory for all files matching *.log and pass them through to Get-Content.
One downside here is that the files are read one by one. Parameters like -Tail are applied on the per-file level. So if you say -Tail 5, it will return the last 5 lines from each file.
This can help if you need to scan a directory of log files for certain messages. Just keep in mind, this may not be very efficient. If you are scanning millions of log messages across dozens of files and you are applying a Where-Object filter, you may run into performance issues. At that point, you may want to consider something that’s a little better at scanning files, or possibly a dedicated logging tool or logging platform.
Live monitoring with -Wait
Now for the fun part…monitoring a log file in “realtime”; this is what we’ve been working up to.
gc '.\2022-04-03.log' -Wait
That’s it. This command will output everything that is in the file…once it reaches the end, it sits and waits. Any time new lines are added to the file, it will output them. This on its own is worth its weight in gold.
Everything we’ve talked about up to this point can also be applied to live monitoring of log files. That means paging, filtering, coloring, etc.
Now combine that with -Tail.
gc '.\2022-04-03.log' -Wait -Tail 0
Every time this command is run, it starts at the end and only listens for new lines added to the file. This is very useful when you are iteratively testing something…make some change, run your code, stop, repeat. You can clear your screen, re-run this command and only listen for new log entries generated by your code.
Working with multiple files using ForEach-Object -Parallel
I was recently working on a project where I needed to monitor 27 different log files all living in 27 different directories. I didn’t want to deal with installing some sort of tool, and it’s something I needed to get up and running on the fly.
I tried searching online to find a solution, and I found this Stack Overflow question. The answer on that question only works for Windows PowerShell, so I tried to come up with a PowerShell Core equivalent.
Monitoring multiple files
In my case, all of the log files I needed to monitor shared a common folder structure and file naming convention. So I was able to figure it out using this script:
gci -Path '*\log\*' -Recurse -Filter '*2022-04-03.log' |
    % -Parallel {
        $file = $_
        gc -Wait -Tail 0 -Path $file |
            % { Write-Host "$($file.Name): ${_}" }
    } -ThrottleLimit 30
Let’s break that down…
gci -Path '*\log\*' -Recurse -Filter '*2022-04-03.log'- First it searches for all paths that match
*\log\*, and then searches for files whose name matches*2022-04-03.log. - This returned all 27 of the files I needed to monitor.
- First it searches for all paths that match
% -Parallel { ... } -ThrottleLimit 30- This allows us to run actions in parallel, rather than all 27 files one by one sequentially.
- I know I need to monitor 27 files, so we can manually set
-ThrottleLimitto 30.
$file = $_- Set aside the file we’re working with into a named variable because we’ll lose scope of
$_later on in the script and we won’t be able to reference it.
- Set aside the file we’re working with into a named variable because we’ll lose scope of
gc -Wait -Tail 0 -Path $file- Start watching the file and output new lines as they are added.
% { Write-Host "$($file.Name): ${_}" }- Prepend every line returned by
Get-Contentwith the name of the log file.
- Prepend every line returned by
Which results in something like this:
MyApp_2022-04-03.log: Original log message 1
OtherApp_2022-04-03.log: Original log message 1
AnotherApp_2022-04-03.log: Original log message 1
Add color randomly
I’ve never used in practice, but I thought it would be fun to figure out and I could see how it could prove to be useful if you need to randomly assign colors to output. Since I was monitoring 27 actively used log files, I needed some way to visually separate one file from another. I applied our -ForegroundColor trick we used earlier.
Unfortunately, there’s only 16 colors defined in the [ConsoleColor] .NET enum, so the best I could do is pick from one of those.
gci -Path '*\log\*' -Recurse -Filter '*2022-04-03.log' |
    % -Parallel {
        $file = $_;
        $color = 1..15 | Get-Random;
        gc -Wait -Tail 0 -Path $file |
            % {
                Write-Host "$($file.Name): ${_}" -ForegroundColor $color;
            }
    } -ThrottleLimit 30
Here I’ve added code to generate a random number between 1 and 15 (inclusive), which may not make sense at first. This is just a shortcut way of picking a random enum value from the [ConsoleColor] .NET enum, where 1 = DarkBlue, 2 = DarkGreen, and so on. Since I use a black background, and 0 = black, I start the numbering at 1. PowerShell/.NET is smart enough to know when I pass in a number between 1 and 15, that it translates it to the associated color.
Another way you could do this that would be a bit more obvious would be:
Get-Random ([System.ConsoleColor].GetEnumNames() | ? { $_ -NE 'Black' })
Final thoughts
If you actually read this giant blog post and are bothering to read my final thoughts section…I applaud and thank you. Obviously there are a lot of tools out there that would probably make this easier. There’s also a lot of tools that may be better suited for scanning, searching and filtering large text files. My personal favorite is ripgrep, and I hope to write a post about it one day.
That said, I feel it’s good to learn how to do things the long way. You won’t always have access to your fancy GUIs and CLI tools, and you may have to deal with what you’ve got at hand.
I’d love to hear feed back on what you think, along with any tips and tricks you might have on this topic as well.
Thanks for reading!